
Painting Plaid

“In learning you will teach, and in teaching you will learn.”
I’ve always enjoyed teaching and motivating others to improve their skills. If you’re any good at anything, don’t be greedy with that knowledge. I say share it with the world and you’ll be better for it! So, this year I started teaching private paint lessons to fellow hobbyists in my local gaming club. It’s been a great experience and I hope my Padawans have gained as much from it as I have.
Recently, one of my students started work on a sci-fi, Caledonian-themed army for Infinity by Corvus Belli. The most challenging technique in this project is the heavy use of tartan patterns. So in this post I thought I’d share with you a simple way of creating a tartan pattern for your kilt wearing, bad ass Scotsmen. Here we go! 🙂
FYI, the Caledonian Confederacy were a group of indigenous peoples of what is now Scotland during the Iron Age and Roman eras. Thanks Wikipedia!
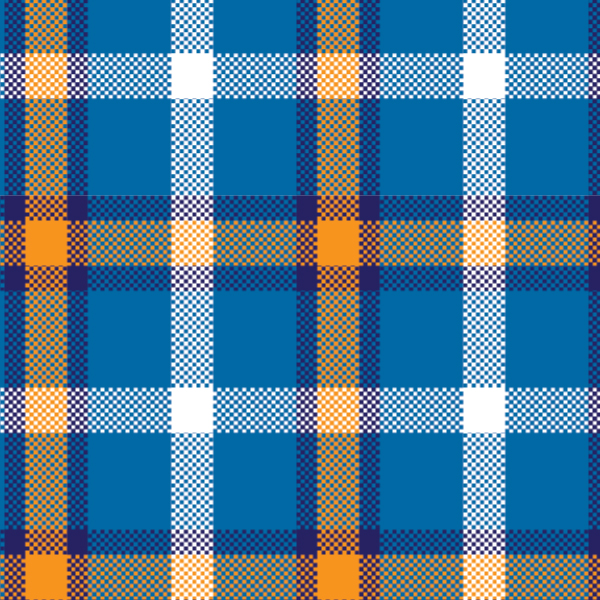
As with most paint projects, it pays to start off with some sort of plan. I created the graphic above to illustrate what a plaid looks like close up. A few things you’ll notice is that there’s a primary color in the background (in this case medium blue) and three secondary colors (navy, orange and white). There are only a few places where colors intersect to give you a 100% saturation the rest are 50/50. Keep in mind that Tartans come in all sorts of patterns and color combos, but for simplicity’s sake and clarity on the tabletop, this is as complicated as I recommend taking the design. Now that I have a plan, lets get to painting!
Paints used:
• Reaper MSP Deep Ocean
• Reaper MSP Marine Teal
• Reaper MSP Surf Aqua
• Reaper MSP Blue Liner
• Reaper MSP Fire Orange
• Reaper MSP Pure White
Brushes used:
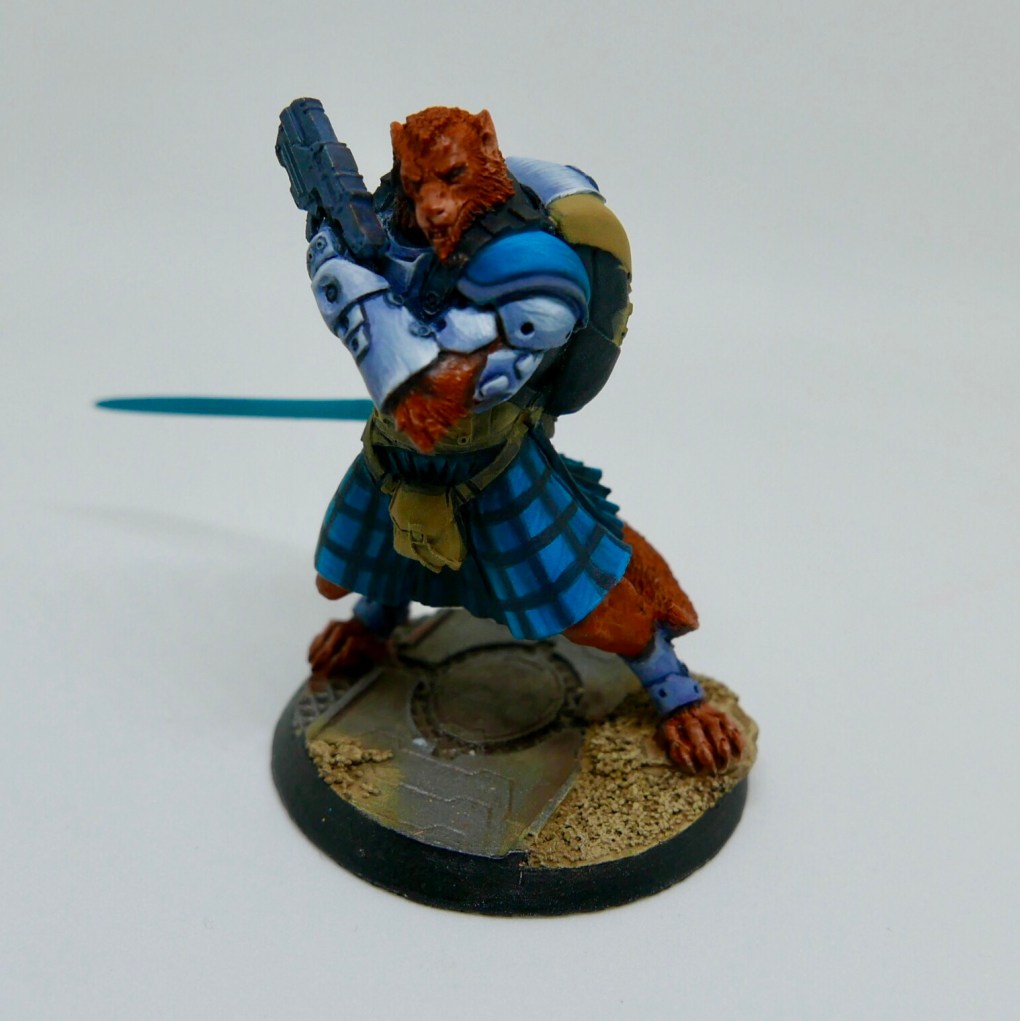 For this tutorial we’re using another model from the Infinity line, McMurrough! Yessiree, it’s everyone’s favorite, chain rifle-toting, furry, friend! Start off by base-coating the kilt with Marine Teal then shading it with Deep Ocean and finally highlight with Surf Aqua. The transitions don’t need to be perfectly blended because most of it will be covered up by the rest of the pattern.
Next, using the #1 brush lay out a navy grid using Blue Liner. In this case each stripe in the grid is about two brush-widths thick and four brush-widths apart but you’ll have to adjust your design on smaller models. Fabric can be tricky to paint so use references of striped and plaid skirts to better understand how the pattern should flow on the garment. For example, on McMurrough’s kilt I tapered the stripes and their spacing towards his waistline where the fabric cinches under the belt.
Other tips to keep in mind:
• Keep your paint watered down (especially when using the Liners)
• Relax and take your time creating the grid
• Be neat and make sure to have plenty of lighting
• If you make a mistake simply wipe it off quickly with a wet napkin and try again
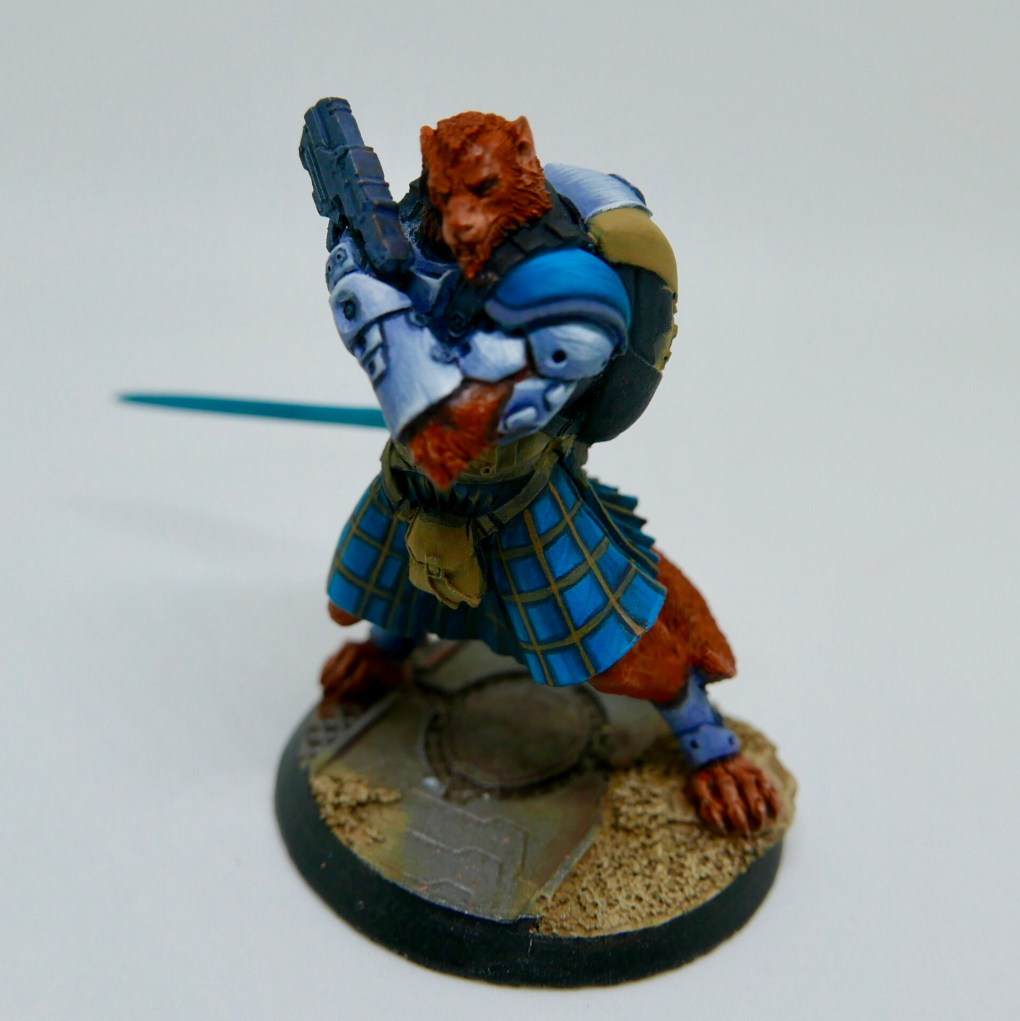
Now it’s time to break up those heavy blue stripes with some orange ones. Using a 30/70 mix of Blue Liner/Fire Orange and the #1 brush, paint on the next set of stripes one brush-width thick along the center of the previous ones. Again, take your time and keep the paint watered down. It’ll take two or three light coats to get nice coverage, but it’s better than clumping on thick paint and making a mess of things.
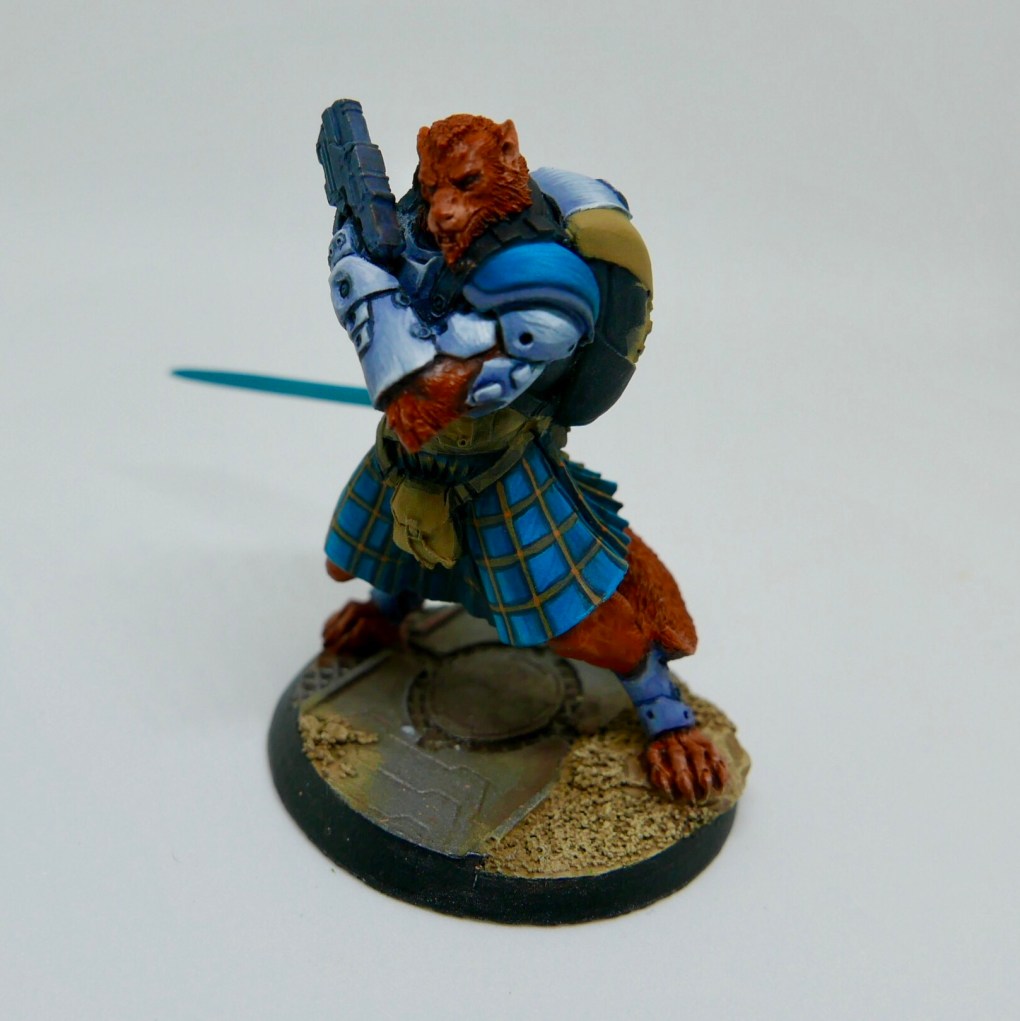
At the intersections paint on pure orange in tiny rectangles using the #0 brush. Now this pattern is really coming together. If we wanted to, we could stop here and have a totally convincing and attractive tartan. However let’s kick it up a notch with one more pop of color. Overachiever!
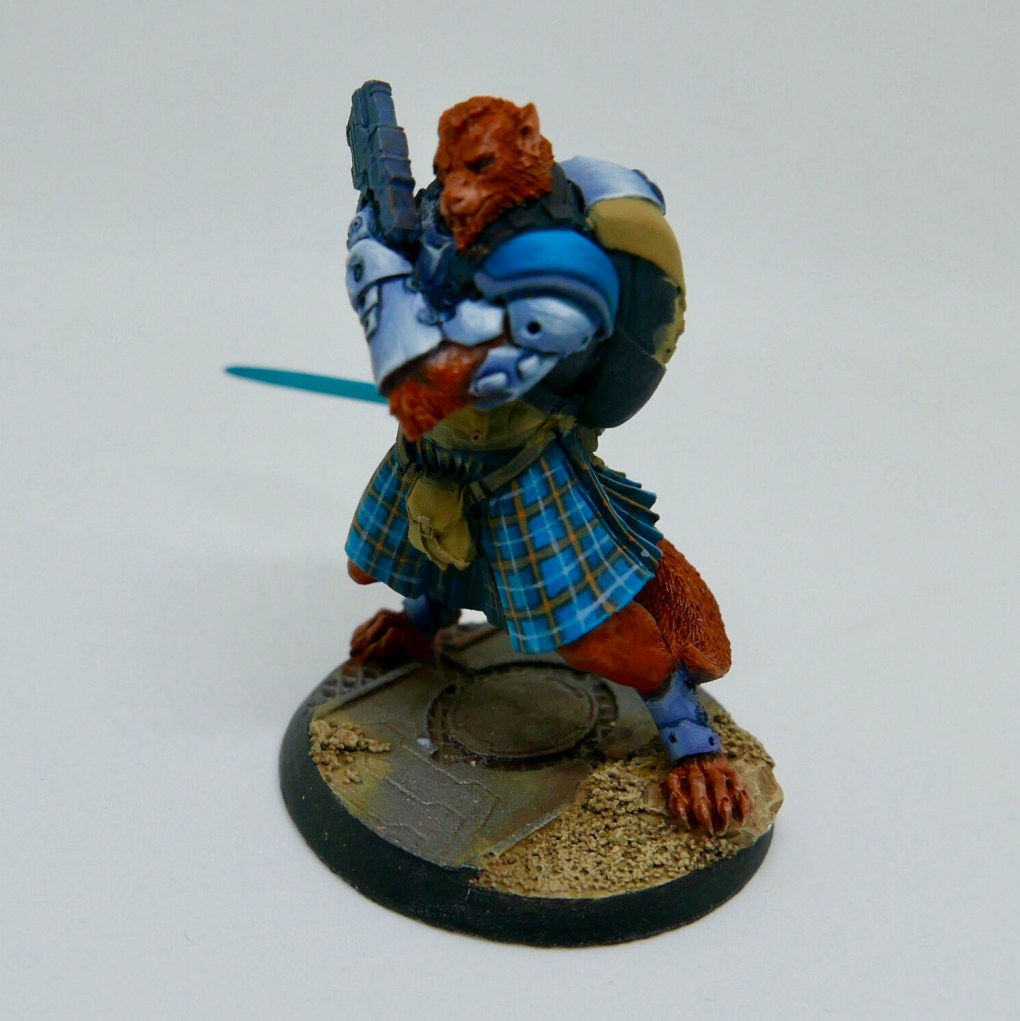
To tie it all together and break up all that blue lets add some Pure White. Again using the #0 brush, apply watered down paint between the other stripes. Oh boy that’s looking slick as ice.
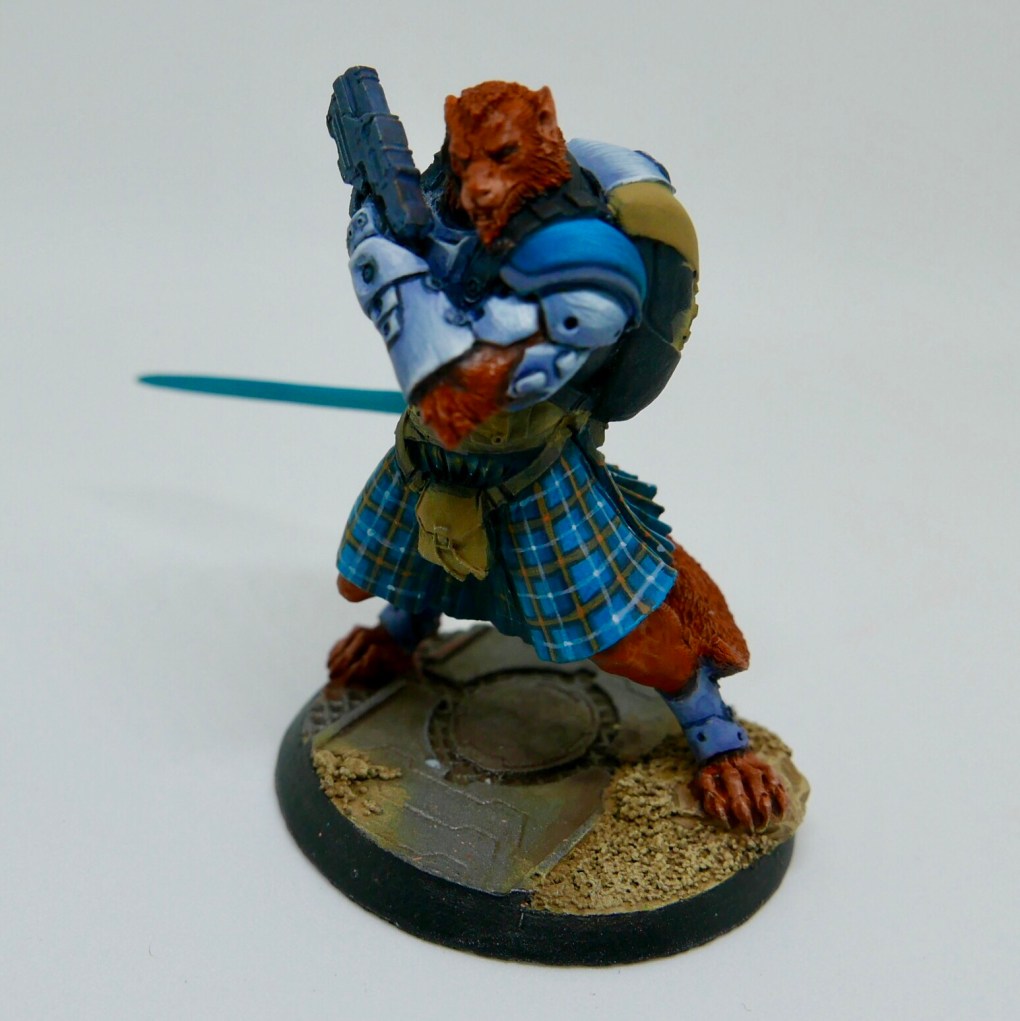
Following that, add some pure white straight out of the bottle to the intersections. And there you have it folks! A lovely tartan to make the most grizzled Scotsman smile. 😀 Now if you’ll excuse me, I have to finish giving McMurrough a proper paint job. Check back next week for pictures of the final product! Thanks for reading and as always, if you enjoyed this post please share it or post a comment!
FYI: I used Reaper Master Series Paints in this tutorial, however these techniques can be used with any paint line. The one thing I have to recommend however are the Reaper MSP Liners. I use them for freehand, line shading, washes and occasionally base-coating. They’re fantastic and a staple to my painting diet. Take a look at some of the items I suggested below via my Amazon Affiliate links. You pay nothing extra and Amazon kicks back a little something for me. Win win!
![]()

Sexy new site there Osographic!
*wolf whistles ala Tex Avery cartoons
Haha! Thank you my lady. 😁